Reverse Applique How-To
First, some news:There is a Modern Siggy swap/quilt that needs a lot more members to get started!! You can find more info here. Basically, you all make a bunch of a very simple block with your signature and location on it, send them to the organizer, and get blocks back from all over the country - and perhaps some other parts of the world! Sort of like a pen pal quilt. There are a ton of variations of quilts you can make with this simple block. Please consider joining us!
Now, on to the main show: Some of you were wondering just how I created the spade in my playing card mini - well, here's a shot at explaining it to you! Just a warning - this was a late at night, last minute kind of quilt, so some of the pictures aren't the best! Be sure to ask if you have a question about a step so I can clarify it for everyone.
First, decide what shape you would like to depict. Dan's quilts, which provided the inspiration, only have one shape featured. I used two: the spade outline, and the shapes within the spade. After completing the reverse applique process, I then raw-edge appliqued it to the white background. If you prefer Dan's look, then you don't need to complete this last step.
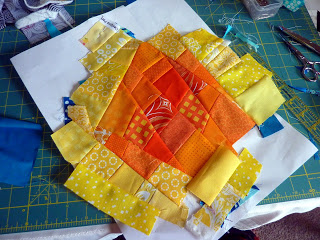
I found a royalty-free piece of clip art to base my quilt on. I enlarged and printed it, and traced the outline to the back of the paper. Then, I worked on my two improv-pieced "layers". My under-layer is scrappy aqua, and the top layer is scrappy orange/yellow. I chose to make the colors gradate, but you don't have to.

The key here is to make sure both finished pieces completely cover the intended shape. Hence the traced outline.
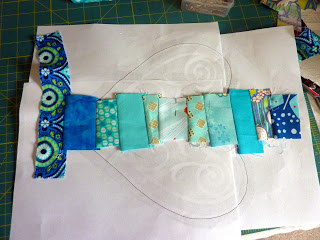
Pin the layers on securely. Keep in mind that you won't be able to access all of the lower layer later on, so keeping those pins on the outside (just ignore that pin in the middle of the blue strip there!!). If you want, place pins all over on the top layer to keep shifting to a minimum.
Wondering why I told you to attach your fabric to the back side? Well, now you know: flip it over. You'll simply stitch directly on the lines of the shapes you want to cut around. I ended up sewing directly on the lines, and cutting out the white areas to reveal aqua below. (Keep in mind that there will be a smidge of fabric past the line, so if it makes a difference, you may want to sew just inside the line.)

The bobbin thread will end up on the top of your pieced item, so choose accordingly! Because there were so many curves and turns, I used my free motion quilting foot and just acted like I was FMQing.
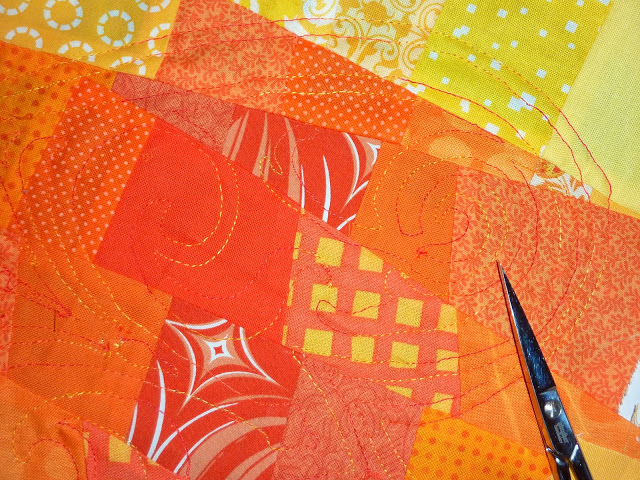

Then, carefully cut out your desired shapes. (For me, these were the white parts of my printed pattern.) This is really tricky - use extremely small scissors to get in those tiny areas. Cut slowly and be sure to constantly check how many layers you are cutting through - I nicked the lower level several times!! When you reach seam allowances in the top layer, cut through one layer of fabric at a time, since you otherwise won't be able to tell easily by feel if you've caught too much fabric.

You are done! I used monofilament thread, with a white bobbin thread and a zig zag stitch to raw edge applique this piece to my white backing.


Thank you so much again for all the kind comments you have given me about this quilt. It was a real learning process for me - I've never done reverse applique before, and I was so inspired by Dan's quilts that I just had to try! I've also been pushing myself outside my comfort zone by doing some occasional impromptu piecing, and I'm slowly getting much much better at it. My thoughts on learning new things? Just try it!! If you don't know how, buy a book, look it up online, whatever. Jump in with both feet, and if you don't like it the first time, try again later. You never know, it might grow on you :)